
Notice
Recent Posts
Recent Comments
Link
Coding Note
게시글 등록 화면 구현하기 본문
부트스트랩 이용하여 화면 구성하기!
부트스트랩, 제이쿼리 등 프론트엔드 라이브러리를 사용할 수 있는 방법은 크게 2가지가 있다.
1. 외부 CDN 사용
2. 직접 라이브러리를 받아서 사용
Q. 레이아웃 방식
- 공통역역을 별도의 파일로 분리하여 필요한 곳에서 가져다 쓰는 방식
1. 레이아웃 파일 만들기
src/main/resources/templates 디렉토리에 layout 디렉토리를 추가 생성한다.
디렉토리안에 footer.mustache, header.mustache 파일 생성

코드는 아래와 같다
- header
<!DOCTYPE HTML>
<html>
<head>
    <title>스프링부트 웹서비스</title>
    <meta http-equiv="Content-Type" content="text/html; charset=UTF-8" />

    <link rel="stylesheet" href="https://stackpath.bootstrapcdn.com/bootstrap/4.3.1/css/bootstrap.min.css">
</head>
<body>
- footer
<script src="https://code.jquery.com/jquery-3.3.1.min.js"></script>
<script src="https://stackpath.bootstrapcdn.com/bootstrap/4.3.1/js/bootstrap.min.js"></script>

<!--index.js 추가-->
<script src="/js/app/index.js"></script>
</body>
</html>
페이지 로딩 속도를 높이기 위해 CSS는 header, JS는 footer에 두었다.
js의 용량이 크면 body 부분의 실행이 늦어지기 때문에 js는 body 하단에 두어 화면이 다 출력된 뒤 호출하는 것이 좋다!
- Index.mustache
{{>layout/header}}

<h1>스프링부트로 시작하는 웹 서비스 Ver.2</h1>
<div class="col-md-12">
    <div class="row">
        <div class="col-md-6">
        //글 등록 버튼을 생성하고 <a> 태그를 사용하여 글 등록 화면으로 이동
            <a href="/posts/save" role="button" class="btn btn-primary">글 등록</a>
        </div>
    </div>
</div>
{{>layout/footer}}
- index.js
등록버튼 기능을 위해 js 파일을 생성한다.
var main = {
    init: function(){
        var _this = this;
        $('#btn-save').on('click', function(){
            _this.save();
        });
    },
    save : function () {
        var data = {
            title: $('#title').val(),
            author: $('#author').val(),
            content: $('#content').val()
        }
        $.ajax({
            type: 'post',
            url: '/api/v1/posts',
            dataType: 'json',
            contentType: 'application/json; charset=utf-8',
            data: JSON.stringify(data)
        }).done(function () {
            alert('글이 등록되었습니다.');
            window.location.href = '/';
        }).fail(function (error) {
            alert(JSON.stringify(error));
        });
    }
};
main.init();
< 등록 화면 >
글 등록 버튼을 누르면 등록 화면으로 이동한다.


등록 버튼 클릭 시 오류 없이 완료되면 "글이 등록되었습니다." 창이 노출된다.
실제로 DB에 데이터가 등록되었는지 확인해보자
브라우저에 http://localhost:8080/h2-console 접속
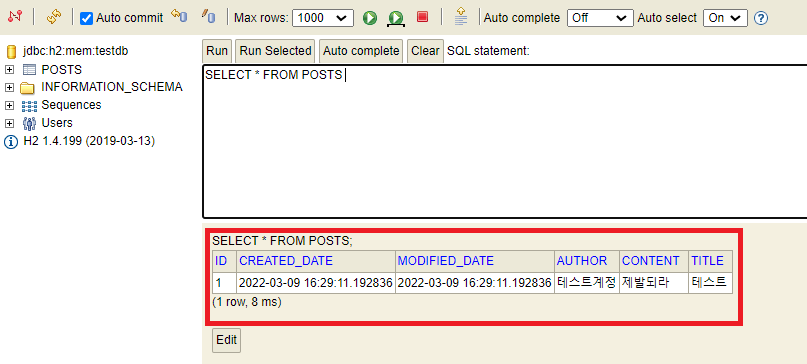
등록 기능이 정상적으로 작동하는 걸 확인할 수 있다!
어쨌든 완성!!!!
'SpringBoot > AWS_PJ' 카테고리의 다른 글
| 스프링 시큐리티와 Oauth2.0 - 구글 서비스 등록 (0) | 2022.03.14 |
|---|---|
| 게시글 조회/수정/삭제 기능 구현하기 (0) | 2022.03.09 |
| 머스테치로 화면 구성하기! (0) | 2022.03.09 |
| JPA Auditing으로 생성 시간/수정 시간 자동화하기! (0) | 2022.03.08 |
| 등록,수정, 조회 API 만들기! (0) | 2022.03.08 |
'SpringBoot/AWS_PJ' Related Articles
more


Comments