Coding Note
스프링 시큐리티와 Oauth2.0_네이버 로그인 구현하기 본문
구글 로그인에 이어 네이버 로그인 구현하기!
1. 네이버 API 등록하기
https://developers.naver.com/apps/#/register?api=nvlogin
애플리케이션 - NAVER Developers
developers.naver.com
접속 후 애플리케이션 이름을 지정하고 아래 사진과 같이 진행하면 된다.


등록버튼을 누르면 네이버 서비스 등록이 완료된다!
ClientID, ClientSecert 발급 완료!
2. application-oauth.properties 등록
# registration
spring.security.oauth2.client.registration.naver.client-id=클라이언트ID
spring.security.oauth2.client.registration.naver.client-secret=PWD
spring.security.oauth2.client.registration.naver.redirect-uri={baseUrl}/{action}/oauth2/code/{registrationId}
spring.security.oauth2.client.registration.naver.authorization-grant-type=authorization_code
spring.security.oauth2.client.registration.naver.scope=name,email,profile_image
spring.security.oauth2.client.registration.naver.client-name=Naver

# provider
spring.security.oauth2.client.provider.naver.authorization-uri=https://nid.naver.com/oauth2.0/authorize
spring.security.oauth2.client.provider.naver.token-uri=https://nid.naver.com/oauth2.0/token
spring.security.oauth2.client.provider.naver.user-info-uri=https://openapi.naver.com/v1/nid/me
spring.security.oauth2.client.provider.naver.user-name-attribute=response
.user-name-attribute=response
- 기준이 되는 user_name의 이름을 네이버에서 응답
스프링 시큐리티에선 하위 필드를 명시할 수 없다.
네이버 응답 값 최상위 필드는 resultCode/message/response
즉, 위에 코드를 확인하면 최상위 필드인 response를 user_name으로 지정한 걸 확인할 수 있다!
3. 스프링 시쿠리티 설정 등록
기존에 생성한 OAuthAttributes에 코드 추가
 public static OAuthAttributes of(String registrationId, String userNameAttributeName, Map<String, Object> attributes) {
        if("naver".equals(registrationId)){
            return ofNaver("id", attributes);
        }
        return ofGoogle(userNameAttributeName, attributes);
    }
if문을 사용해 네이버 로그인인지 판단하는 기능 생성
//Naver 생성자
    private static OAuthAttributes ofNaver(String userNameAttributeName, Map<String, Object> attributes) {
        Map<String, Object> response = (Map<String, Object>) attributes.get("response");

        return OAuthAttributes.builder()
                .name((String) response.get("name"))
                .email((String) response.get("email"))
                .picture((String) response.get("profile_image"))
                .attributes(response)
                .nameAttributeKey(userNameAttributeName)
                .build();
    }
4. index.mustache 네이버 로그인 버튼 추가
<a href="/oauth2/authorization/naver" class="btn btn-secondary active" role="button">Naver Login</a>"/oauth2/authorization/naver"
- application-oauth.properties에 등록한 redirect-uri 값에 맞춰 자동으로 로그인됨
5. 결과
- 로그인 버튼 추가

- 로그인 기능

완료!!
기존 테스트에 시큐리티 적용하기
기존 API 테스트 코드들이 모두 인증에 대한 권한을 받지 못하였으므로,
테스트 코드마다 인증한 사용자가 호출한 것처럼 작동하도록 수정!
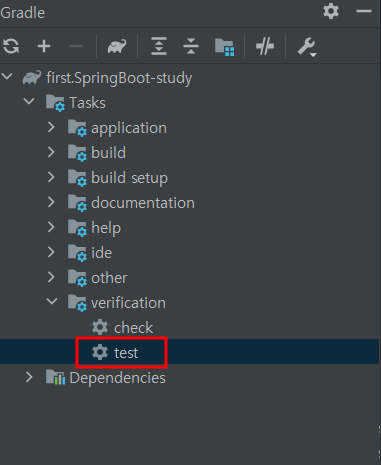
Gradle 탭 클릭 > Tasks >vertification> test 클릭하면 전체 테스를 수행함

실행하면 지금까지 잘 작동했던 테스트 모두 실패하는 것을 확인할 수 있다.
< 실패 원인 >
1. CustomOAuthUserService을 찾을 수 없음
소셜 로그인 관련 설정값들이 없어 발생한 오류
분명 선언했는데 오류가 뜨는 이유는 환경 차이 때문이다.
이에 따른 해답은 테스트 환경을 위한 application.properties를 만든다!
실제 구글 연동까지 진행할 건 아니기 때문에 가짜 설정값을 등록한다.

- application.properties
spring.jpa.show_sql=true
spring.jpa.properties.hibernate.dialect=org.hibernate.dialect.MySQL5InnoDBDialect
spring.h2.console.enabled=true
spring.session.store-type=jdbc

# Test OAuth

#가짜 설정값
spring.security.oauth2.client.registration.google.client-id=test
spring.security.oauth2.client.registration.google.client-secret=test
spring.security.oauth2.client.registration.google.scope=profile,email
2. 302 Status Code
빌드 파일에 의존성 추가
  //시큐리티 테스트
testImplementation 'org.springframework.security:spring-security-test'
- PostApiControllerTest
임의 사용자 인증 추가
@Test
@WithMockUser(roles = "USER")//임의 사용자 인증 추가
public void Posts_등록된다() throws Exception {
~~~}

@Test
@WithMockUser(roles = "USER")//임의 사용자 인증 추가
public void Posts_수정된다() throws Exception {
~~~}
@WithMockUser(roles = "USER")
- 인증된 모의(가짜) 사용자를 만들어서 사용
- roles에 권한을 추가
- 즉, 이 어노테이션으로 인해 ROLE_USER 권한을 가진 사용자가 API를 요청하는 것과 동일한 효과를 가짐
이어서 기존 파일은 @SpringBootTest로만 선언되어있어 MockMvc를 전혀 사용하지 못함으로 코드를 수정한다.
@RunWith(SpringRunner.class)
@SpringBootTest(webEnvironment = SpringBootTest.WebEnvironment.RANDOM_PORT)
public class PostsApiControllerTest {


    @LocalServerPort
    private int port;

    @Autowired
    private TestRestTemplate restTemplate;

    @Autowired
    private PostsRepository postsRepository;

    @Autowired
    private WebApplicationContext context;

	//MockMvc 선언
    private MockMvc mvc;

    @Before//코드 추가
    public void setup() {
        mvc = MockMvcBuilders
                .webAppContextSetup(context)
                .apply(springSecurity())
                .build();
    }

    @After
    public void tearDown() throws Exception {
        postsRepository.deleteAll();
    }

    @Test
    @WithMockUser(roles = "USER")//임의 사용자 인증 추가
    public void Posts_등록된다() throws Exception {
        //given
        String title = "title";
        String content = "content";
        PostsSaveRequestDto requestDto = PostsSaveRequestDto.builder()
                .title(title)
                .content(content)
                .author("author")
                .build();

        String url = "http://localhost:" + port + "/api/v1/posts";

        //when
        mvc.perform(post(url)
                .contentType(MediaType.APPLICATION_JSON_UTF8)
                .content(new ObjectMapper().writeValueAsString(requestDto)))
                .andExpect(status().isOk());

        //then
        List<Posts> all = postsRepository.findAll();
        assertThat(all.get(0).getTitle()).isEqualTo(title);
        assertThat(all.get(0).getContent()).isEqualTo(content);
    }


    @Test
    @WithMockUser(roles = "USER")//임의 사용자 인증 추가
    public void Posts_수정된다() throws Exception {
        //given
        Posts savedPosts = postsRepository.save(Posts.builder()
                .title("title")
                .content("content")
                .author("author")
                .build());

        Long updateId = savedPosts.getId();
        String expectedTitle = "title2";
        String expectedContent = "content2";

        PostsUpdateRequestDto requestDto = PostsUpdateRequestDto.builder()
                .title(expectedTitle)
                .content(expectedContent)
                .build();

        String url ="http://localhost:" + port + "/api/v1/posts/" +updateId;

        HttpEntity<PostsUpdateRequestDto> requestEntity = new HttpEntity<>(requestDto);

        //when
        mvc.perform(put(url)
                .contentType(MediaType.APPLICATION_JSON_UTF8)
                .content(new ObjectMapper().writeValueAsString(requestDto)))
                .andExpect(status().isOk());

        //then
        List<Posts> all = postsRepository.findAll();
        assertThat(all.get(0).getTitle()).isEqualTo(expectedTitle);
        assertThat(all.get(0).getContent()).isEqualTo(expectedContent);
    }
}
@Before
- 매번 테스트가 시작되기 전에 MocMvc 인스턴스를 생성
mvc.perform
- 생성된 MocMvc를 통해 API테스트 진행
- 위 코드는 문자열로 표현하기 위해 ObjectMapper를 통해 문자열 JSON으로 변환한다.
3. @WebMvcTest에서 CustomOAuth2UserService을 찾을 수 없습니다.
@WebMvcTest는 CustomOAuth2UserService를 스캔하지 않기 때문에 발생하는 오류
즉, HelloControllerTest에서 코드 수정하기!
- HelloControllerTest
상위에 추가
@WebMvcTest(controllers = HelloController.class,
        excludeFilters = {
        @ComponentScan.Filter(type = FilterType.ASSIGNABLE_TYPE, classes = SecurityConfig.class)
        }
)
또한 위와 마찬가지로 가짜로 인증된 사용자를 생성한다.
@WithMockUser(roles = "USER")//가짜 인증된 생성자
마지막으로 @EnableAuditing과 @SpringBootApplication 분리하기!!
appliation 파일에서 @EnableAuditing 선언을 삭제한다.
config폴더에 JpaConfig를 생성하여 @EnableAuditing을 선언한다!
- JpaConfig
package com.bs.book.springboot.config.auth;

import org.springframework.context.annotation.Configuration;
import org.springframework.data.jpa.repository.config.EnableJpaAuditing;

@Configuration
@EnableJpaAuditing //Jpa Auditing 활성화
public class JpaConfig {}
그리고 test를 실행하면!!
원래!!!
책대로라면... 테스트를 통과해야 된다.
but, 역시나 오류가 떴다ㅠㅠ
errer
- Execution failed for task : 'test'
test를 실패했다는 오류

보고서를 읽어봐도 뭔 소리인지..
구글링을 해봐도 설명해주신 설정 방법의 설정은 똑같았다.
다시 test를 해보니 아래와 같은 에러가 출력되었다.
Task :test FAILED
FAILURE: Build failed with an exception.
- What went wrong:
Execution failed for task ':test'.
There were failing tests. See the report at: file:///C:/Users/jin/~

해석해보니 위랑 똑같은 에러였다.
구글링 해본 결과 test 프로젝트를 우클릭하여 'Run all tests'를 클릭하니 잘 실행되었다!!

코드 문제는 아닌 걸로!
완료!
'SpringBoot > AWS_PJ' 카테고리의 다른 글
| AWS 데이터베이스 환경 만들기 - AWS RDS (0) | 2022.03.25 |
|---|---|
| AWS 서버 환경 만들기 - AWS EC2 (0) | 2022.03.24 |
| 스프링 시큐리티와 Oauth2.0_기능 개선하기 (0) | 2022.03.15 |
| 스프링 시큐리티와 Oauth2.0 - 구글 로그인 기능 구현하기 (0) | 2022.03.14 |
| 스프링 시큐리티와 Oauth2.0 - 구글 서비스 등록 (0) | 2022.03.14 |


